Subcollections in NEN Connect
Subcollections are intended to, for instance, create a project specific collection of documents from the main collection your company has access to. By assigning access to only the members of this project everyone can easily find the documents they need.
Both company admins and experts can create and manage subcollections. The person who created the subcollection is automatically assigned as the owner. This can be changed afterwards.
A user can only see the subcollection he or she is assigned to. The expert can only see the subcollection he or she is assigned to and can only manage those he or she owns. However the company admin can see and manage all subcollections, owner or not.
The subcollections can be found via both the tab “Documents” and “Collections”.

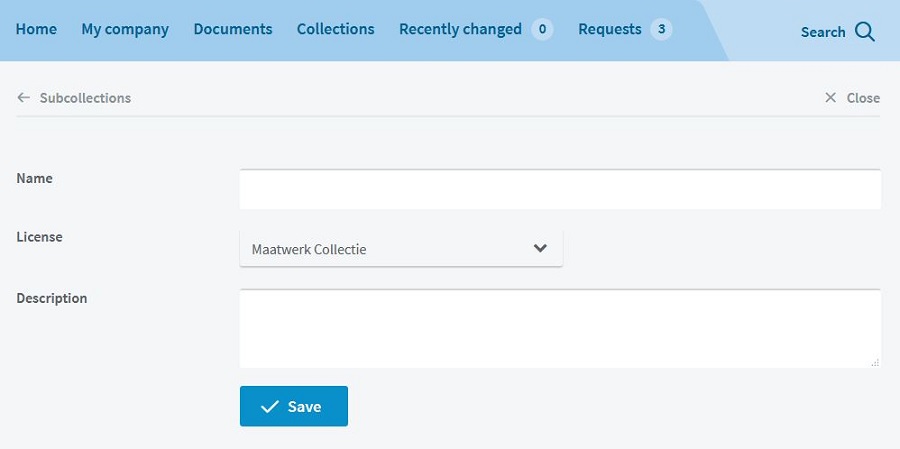
Creating and managing a subcollection
Via the tab “Collections” an expert or company admin can create or manage an unlimited amount of subcollections. The documents in a subcollection will be updated automatically in case of any changes.
- Click on “Add subcollection”.
- Fill out the name of the subcollection. Maximum of 29 characters.
- Select the license from which the documents can be selected.
- Enter a description. This will only be available to the owner of the subcollection and the company admins when viewing the details of the subcollection via editing.
Adding standards to a subcollection
Documents can only added if they are already part of the one of the collections that are assigned to the license. This needs to be same license that is assigned to the subcollection. If the document is not part of the collection then it first needs to be added similar to any other document.
Adding documents can be done in three different ways:
Option 1:
- Subcollection detail page > Expert/company admin clicks on “Add documents to this subcollection >
- Documents search results page > Click on the document in the search result >
- Document detail page > Click on “Add to another collection” or “Add to subcollection”
Option 2:
- Documents search results page > Click on the document in the search result >
- Document detail page > Click on “Add to another collection” or “Add to subcollection”
Option 3:
- Specific URL >
- Document detail page > Click on “Add to another collection” or “Add to subcollection”
Removing standards from a subcollection
Removing a document from subcollction does not remove it from the main collection or license.
Please note: An expert can only remove a document from the subcollection. Not from the main collection or license. If a company admin removes a document from a license or main collection the document will remain to be listed in the subcollection. However you can only view the metadata. You cannot access the document itself.
Option 1:
- Subcollection detail page > Expert/company admin clicks on “Remove documents from this subcollection >
- Documents search results page > Select one or more documents in the search result that you would like to remove. Click on “Remove selected documents” at the bottom of the search results.
Or click on the bin-icon that is displayed when mousing over the different search results.
Option 2:
- Document search results page > As soon as the expert or company admin selects one subcollection via the search filters the options remove one or more documents are shown. Either select one or more documents and click on “Remove selected documents” at the bottom of the search results.
Or click on the bin-icon that is displayed when mousing over the different search results.